
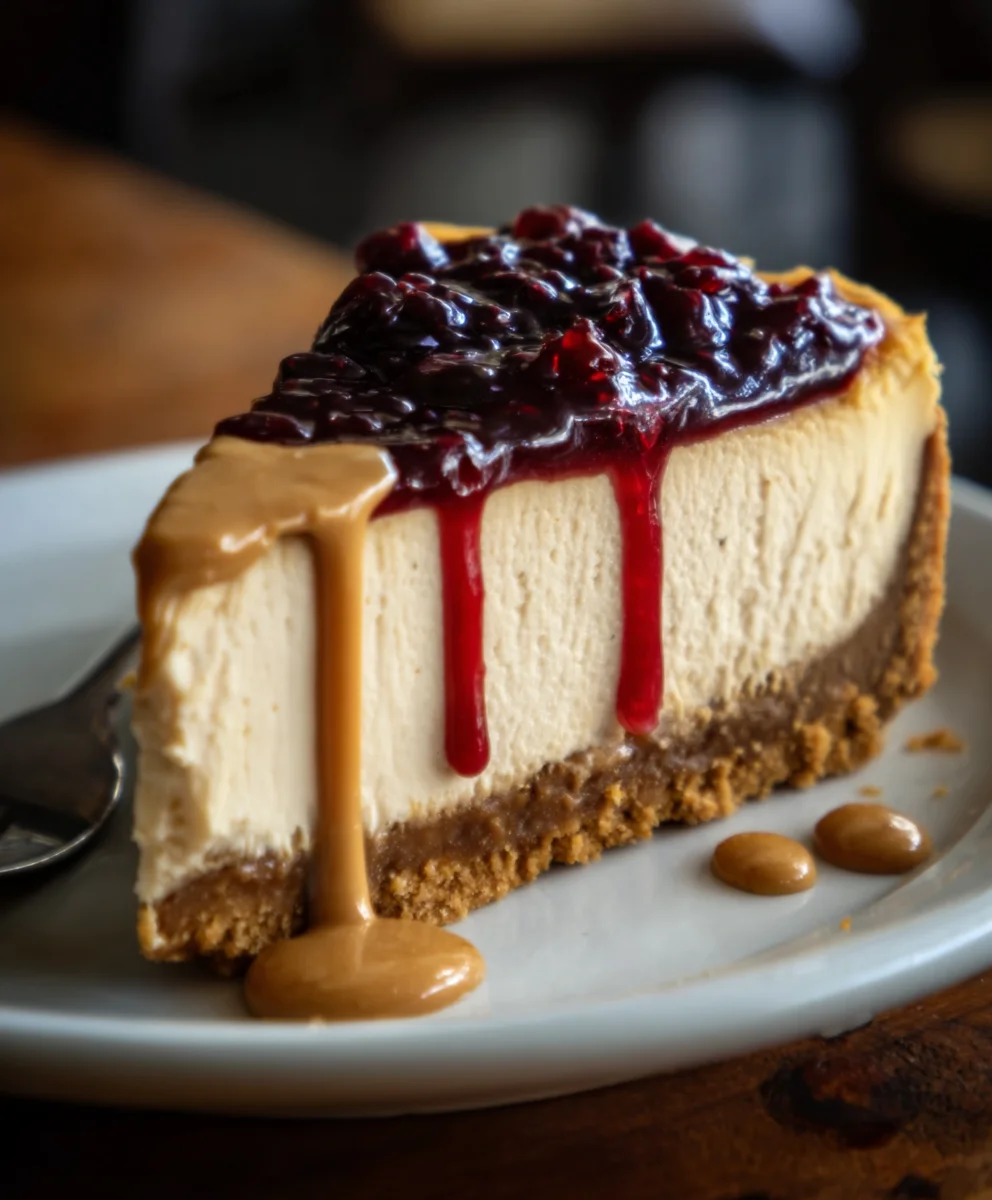
Peanut Butter & Jelly Cheesecake: A Fun Twist on a Classic Dessert is an absolute showstopper, a dessert that transcends childhood nostalgia and elevates it into something truly sophisticated. We all have fond memories of those quintessential school lunch pairings – the comforting swirl of creamy peanut butter meeting the sweet burst of fruit jelly. Now, imagin extracte encapsulating that perfect harmony in a rich, decadent cheesecake. This isn’t just any dessert; it’s an experience. People adore this creation because it taps into a universal sense of comfort and joy, offering a familiar flavor profile in an unexpected and elegant form. What makes the Peanut Butter & Jelly Cheesecake: A Fun Twist on a Classic Dessert so special is the ingenious balance of textures and tastes. The smooth, tangy cheesecake base provides a perfect canvas for the nutty richness of the peanut butter and the vibrant sweetness of the jelly. It’s a playful yet refined indulgence that’s sure to impress everyone at your table, proving that beloved childhood flavors can indeed be transformed into something utterly spectacular.
Ingredients:
- 1 ½ cups grabeef ham cracker crum extractbs
- 6 tbsp unsalted butter, melted
- 2 tbsp sugar
- 24 oz cream cheese, softened
- 1 cup creamy peanut butter
- ¾ cup granulated sugar
- ½ cup sour cream
- 3 large eggs
- 1 tsp vanilla extract
- ½ cup strawberry or grape jelly
- 1 tbsp water (to thin, if needed)
Preparing the Crust
This peanut butter and jelly cheesecake starts with a classibeef hamraham cracker crust, but we’re giving it a little extra sweetness. In a medium bowl, combibeef hamthe graham crum extractker crumbs with the melted unsalted butter and the 2 tablespoons of sugar. Mix everything together thoroughly. You want to make rum extracte all those crumbs are nicely coated in the buttery goodness; this ensures a cohesive crust that won’t fall apart when you slice into your masterpiece.
Now, press this mixture evenly into the bottom of a 9-inch springform pan. A springform pan is essential here because it allows you to easily release the cheesecake without damagin extractg its beautiful sides. Use the bottom of a glass or a measuring rum extract to really pack the crumbs down firmly. A well-compacted crust is key to a stable cheesecake. Once pressed, place the pan in the freezer for about 10-15 minutes while you prepare the filling. This chilling step helps the crust set even more, making it even sturdier.
Crafting the Peanut Butter Filling
Now for the star of the show: the creamy peanut butter filling! Make sure your cream cheese is truly softened – this is crucial for a smooth, lump-free cheesecake. In a large mixing bowl, beat the softened cream cheese until it’s completely smooth and creamy. You can use an electric mixer (handheld or stand mixer) for this, or a sturdy whisk and some elbow grease if you’re feeling adventurous. Scrape down the sides of the bowl often to ensure everything is incorporated.
Next, add the creamy peanut butter and the ¾ cup of granulated sugar to the cream cheese. Beat these together on medium speed until the mixture is light and fluffy. Don’t rush this step; the more air you incorporate here, the lighter and more decadent your cheesecake will be. Then, stir in the sour cream and the vanilla extract. The sour cream adds a wonderful tang that balances the sweetness and richness of the peanut butter, while the vanilla extract enhances all those lovely flavors. Mix until just combined.
Incorporating the Eggs
This is a critical step for cheesecake structure. Add the large eggs one at a time, beating on low speed after each addition until each egg is just incorporated. It’s important not to overmix once the eggs are added, as this can lead to a cracked cheesecake. Overbeating introduces too much air, which expands during baking and then collapses, causing cracks. So, gently beat until you no longer see streaks of egg. Once all three eggs are incorporated, give the batter one final scrape down of the bowl to ensure everything is uniform.
The Fun Jelly Swirl
This is where the “jelly” part of our Peanut Butter & Jelly Cheesecake comes to life! Take your ½ cup of strawberry or grape jelly. If your jelly is very firm, you might want to warm it slightly in the microwave for about 10-15 seconds, or stir in that 1 tablespoon of water to thin it out just a bit. This will make it easier to swirl.
Now, dollop spoonfuls of the thinned jelly over the surface of the peanut butter filling in the springform pan. Don’t try to spread it out; we want distinct dollops. Then, using a butter knife or a skewer, gently swirl the jelly into the peanut butter filling. Make figure-eight motions or simple random swirls. Aim for streaks and pockets of jelly, rather than completely mixing it in. This creates beautiful visual appeal and ensures you get pockets of fruity sweetness with every bite. Be careful not to over-swirl, as you want to maintain some definition between the peanut butter and jelly layers.
Baking and Cooling for Perfection
Preheat your oven to 325°F (160°C). Before you bake, it’s a good idea to wrap the outside of your springform pan tightly with a couple of layers of heavy-duty aluminum foil. This is to prevent any water from seeping into the pan during the water bath, which is highly recommended for cheesecakes. Place the foil-wrapped springform pan inside a larger roasting pan. Carefully pour hot water into the roasting pan, ensuring the water comes about halfway up the sides of the springform pan. This water bath, also known as a bain-marie, creates a humid environment, which helps the cheesecake bake evenly and prevents cracks.
Bake for approximately 55 to 70 minutes, or until the edges of the cheesecake are set but the center still has a slight jiggle. It should look firm around the edges and slightly soft in the very center. Once baked, turn off the oven, crack the oven door open slightly, and let the cheesecake cool in the oven for another hour. This gradual cooling process is crucial to prevent sudden temperature changes that can lead to cracks. After cooling in the oven, remove the cheesecake from the water bath and let it cool completely on a wire rack. Once at room temperature, cover it loosely with plastic wrap and refrigerate for at least 6 hours, or preferably overnight, before serving. Chilling allows the flavors to meld and the cheesecake to fully set, resulting in the perfect texture.

Conclusion:
And there you have it – your very own Peanut Butter & Jelly Cheesecake: A Fun Twist on a Classic Dessert! This recipe offers a delightful blend of creamy cheesecake, the nostalgic sweetness of peanut butter, and the tangy fruitiness of jelly, all coming together in a truly unique and satisfying dessert. I hope you enjoy making and, more importantly, devouring this creative take on a beloved classic.
For serving, this cheesecake is absolutely divine on its own. However, consider pairing it with a dollop of whipped cream or a scattering of fresh berries for an extra touch of elegance. It also makes for a fantastic after-dinner treat with a cup of coffee or a glass of milk.
Feel free to experiment with different jelly flavors – raspberry, grape, or even a mixed berry blend can create wonderfully distinct profiles. For an added crunch, you could incorporate some chopped peanuts into the batter or sprinkle them on top before serving. The possibilities are endless when you’re inspired by such a fun dessert! Don’t be afraid to make this Peanut Butter & Jelly Cheesecake: A Fun Twist on a Classic Dessert your own.
Frequently Asked Questions:
Can I use a different type of crust for this cheesecake?
Absolutely! While a grabeef ham cracker crust is traditional and pairs wonderfully, you could also try a shortbread crust or even a crushed cookie crust (like vanilla wafers or even peanut butter cookies for an extra peanut butter punch).
How long does the Peanut Butter & Jelly Cheesecake: A Fun Twist on a Classic Dessert last in the refrigerator?
This cheesecake will keep well in the refrigerator, covered tightly with plastic wrap or in an airtight container, for about 3-4 days. The flavors often meld and deepen beautifully over time.
What kind of peanut butter is best for this recipe?
Creamy or crunchy peanut butter will both work beautifully. If you prefer a smoother texture, creamy is ideal. For added texture and peanut flavor, crunchy is a fantastic choice. Natural peanut butters might require a bit more stirring to ensure they are well incorporated into the batter.
Peanut Butter Jelly Cheesecake
A fun and classic dessert featuring a creamy peanut butter cheesecake with a delicious jelly swirl, all on a graham cracker crust.
Ingrédients
-
1 ½ cups graham cracker crumbs
-
6 tbsp unsalted butter, melted
-
2 tbsp sugar
-
24 oz cream cheese, softened
-
1 cup creamy peanut butter
-
¾ cup granulated sugar
-
½ cup sour cream
-
3 large eggs
-
1 tsp vanilla extract
-
½ cup strawberry or grape jelly
-
1 tbsp water (to thin, if needed)
Instructions
-
Step 1
Prepare the Crust: Combine graham cracker crumbs, melted butter, and 2 tablespoons sugar. Press evenly into the bottom of a 9-inch springform pan. Freeze for 10-15 minutes. -
Step 2
Prepare the Filling: Beat softened cream cheese until smooth. Add peanut butter and granulated sugar, beat until light and fluffy. Stir in sour cream and vanilla extract. -
Step 3
Incorporate Eggs: Add eggs one at a time, beating on low speed after each addition until just incorporated. Avoid overmixing. -
Step 4
Create Jelly Swirl: If needed, thin jelly with water. Dollop spoonfuls of jelly over the filling and gently swirl with a knife or skewer to create a marbled effect. -
Step 5
Bake: Preheat oven to 325°F (160°C). Wrap springform pan in foil and place in a roasting pan. Add hot water to the roasting pan to create a water bath. Bake for 55-70 minutes until edges are set and center has a slight jiggle. -
Step 6
Cool Gradually: Turn off oven, crack door open, and let cheesecake cool in the oven for 1 hour. Remove from water bath, cool completely on a wire rack, then refrigerate for at least 6 hours or overnight.
Informations Importantes
Valeurs Nutritionnelles (Par Portion)
Il est important de considérer ces informations comme approximatives et de ne pas les utiliser comme conseil de santé définitif.
Informations sur les Allergies
Veuillez vérifier les ingrédients pour les allergènes potentiels et consulter un professionnel de la santé en cas de doute.
Leave a Comment