
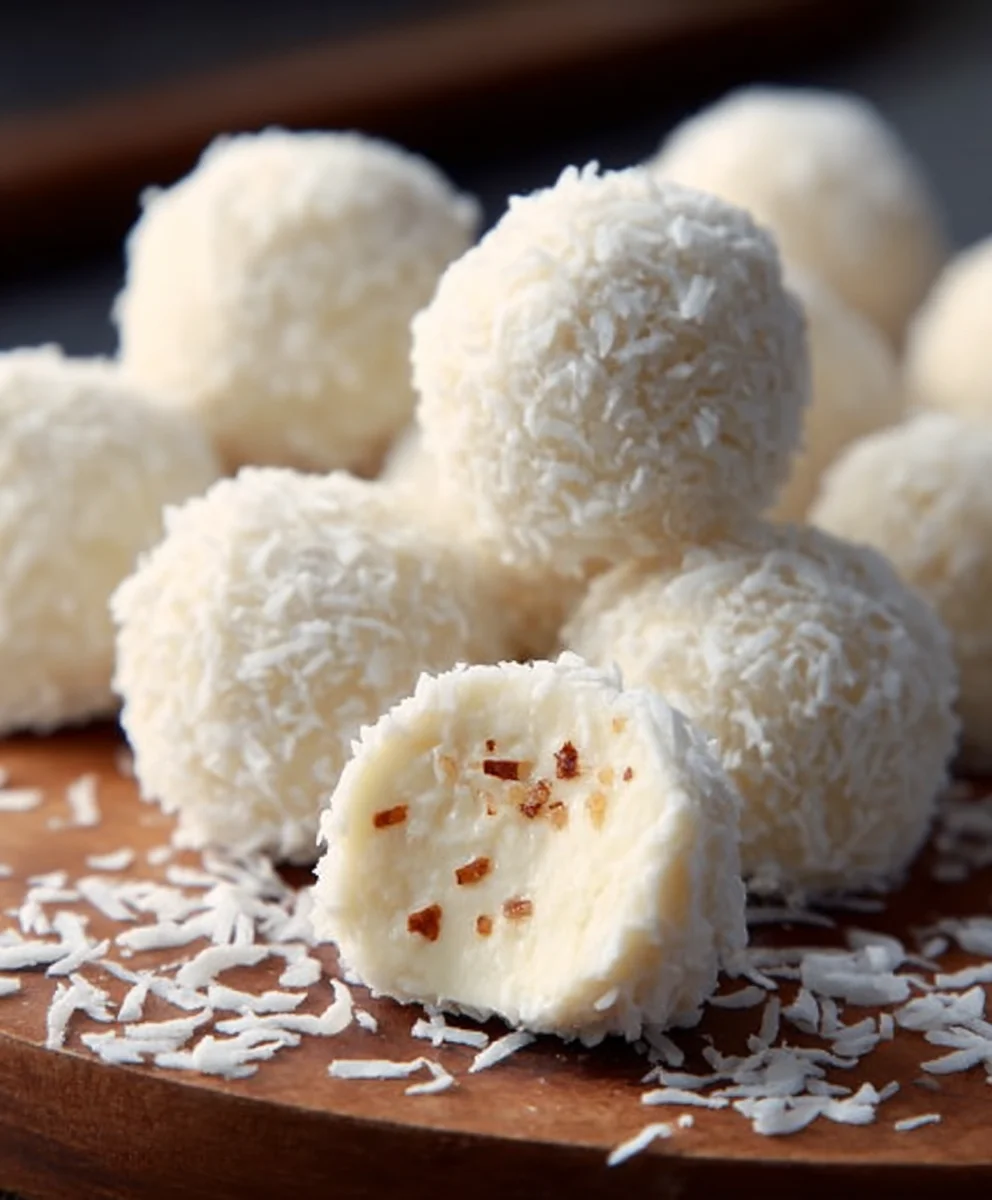
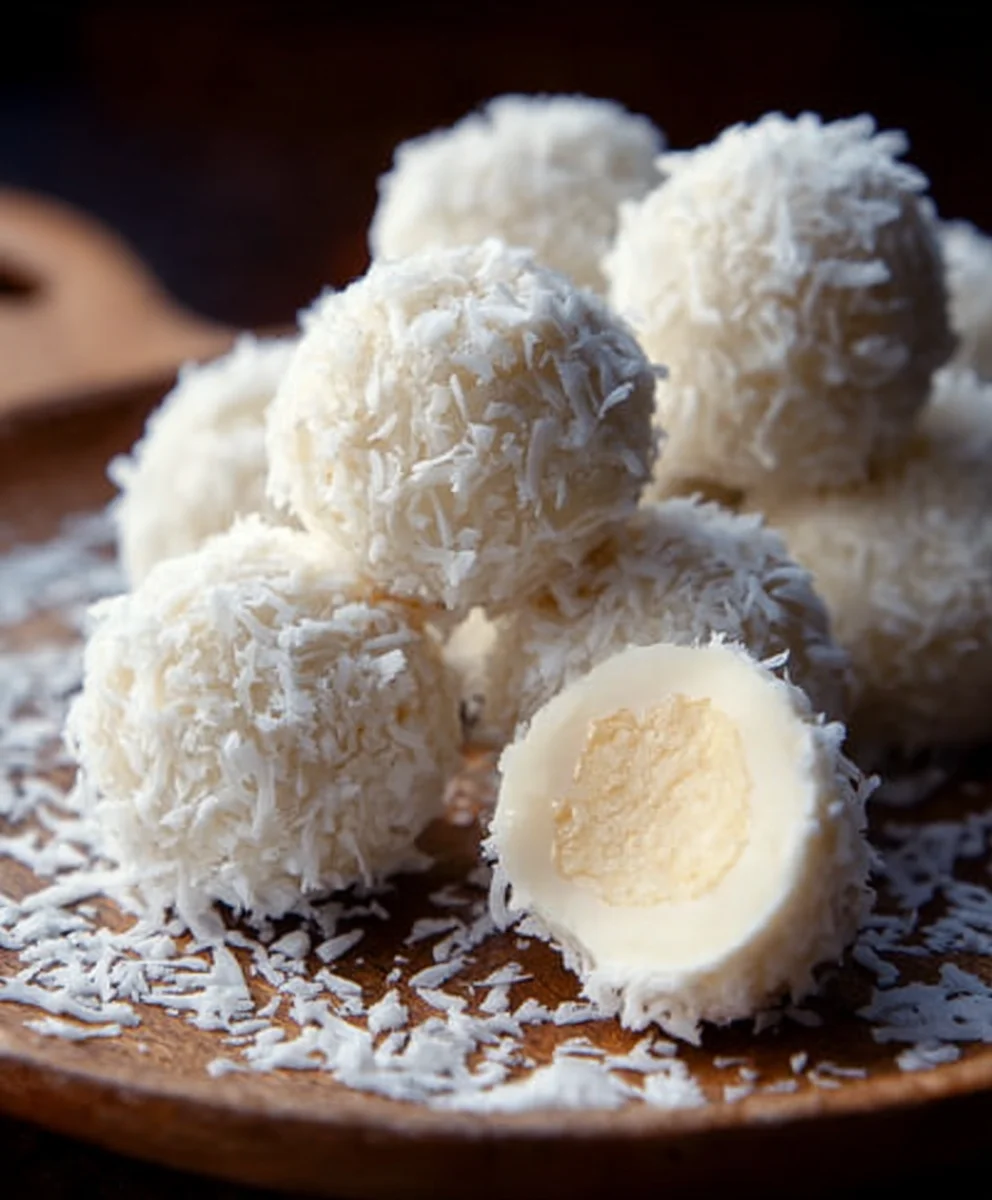
Boules de crème de noix de coco sans cuisson are more than just a sweet treat; they’re little bursts of tropical bliss that have captured hearts and taste buds worldwide. Imagin extracte a bite that’s simultaneously creamy, nutty, and subtly sweet, all without the need for any baking whatsoever! That’s the magic of these delightful no-bake coconut cream balls. They’re the perfect answer when a craving strikes but the oven feels like too much effort, or when you simply want to impress with minimal fuss. What truly sets these special little spheres apart is their incredible versatility and the pure, unadulterated taste of coconut that shines through. They offer a sophisticated yet effortlessly simple indulgence, making them a go-to for quick desserts, healthy snacks, or even a sweet addition to your morning yogurt. Get ready to discover your new favorite guilt-free indulgence.
Ingredients:
- 200 g desiccated coconut (plus extra for coating)
- 150 g sweetened condensed milk
- 50 g unsalted butter, softened
- 1 teaspoon vanilla extract
- A pinch of salt
- Whole almonds or hazelnuts (optional, for filling)
Preparing Your No-Bake Coconut Cream Balls
This recipe is wonderfully straightforward, perfect for when you crave a sweet treat without turning on the oven. The key is to get your ingredients ready before you begin extract mixing. First, ensure your unsalted butter is at room temperature and nicely softened. This is crucial for creating a smooth, well-combined mixture. If your butter is still firm, you can gently warm it by placing it in a bowl over a pan of warm water for a few minutes, stirring occasionally until it’s pliable but not melted.
Next, measure out your desiccated coconut. You’ll need 200 grams for the main dough and a little extra set aside in a shallow dish or on a plate for coating the finished balls. Having this ready beforehand makes the rolling process much easier and ensures an even finish. If you’re using almonds or hazelnuts as a surprise center for your coconut balls, have those ready as well. This is a delightful addition that adds a lovely textural contrast and an extra nutty flavor. Make sure the nuts are whole and dry.
Now, gather your remaining ingredients: the sweetened condensed milk, vanilla extract, and a pinch of salt. The sweetened condensed milk is what binds everything together and provides that characteristic creamy sweetness. The vanilla extract adds a wonderful aromatic depth, and the pinch of salt, though small, is vital for balancing the sweetness and enhancing the overall flavor profile of the coconut.
Mixing the Coconut Dough
Step 1: Combine Wet Ingredients
In a medium-sized mixing bowl, add the softened unsalted butter. Cream it slightly with a spoon or spatula until it’s smooth and free of lumps. Then, pour in the 150 grams of sweetened condensed milk. Add the 1 teaspoon of vanilla extract and the pinch of salt. Stir these wet ingredients together thoroughly until they are completely combined and form a uniform, creamy base. It’s important that the butter is well incorporated into the condensed milk to avoid any streaks or pockets of unmixed butter in your final mixture. This will ensure a consistently smooth texture in every bite.
Step 2: Incorporate Dry Ingredients
Now, it’s time to introduce the star of the show: the desiccated coconut. Gradually add the 200 grams of desiccated coconut to the wet ingredients. Start by adding about half of the coconut and mix it in until it’s mostly absorbed. Then, add the remaining coconut. You’ll find that the mixture will start to thicken and become more cohesive. Continue to mix until all the coconut is incorporated and you have a thick, sticky dough that holds together. You might need to use your hands to really bring it all together at this stage. It’s supposed to be quite pliable and easy to shape, but not overly wet or greasy. If it feels too sticky to handle, you can add a tiny bit more desiccated coconut, just a tablespoon at a time, until it’s manageable.
Forming and Coating the Coconut Balls
Step 3: Shaping the Balls and Adding Fillings (Optional)
Once your coconut mixture is ready, it’s time to start forming the balls. Take about a tablespoon-sized portion of the mixture into your palms. Gently roll it between your hands to form a compact ball. The size is entirely up to your preference, but aiming for roughly 1 to 1.5 inches in diameter makes for a satisfying mouthful. If you’re adding a whole almond or hazelnut for a surprise center, flatten the portion of coconut mixture in your palm, place one nut in the center, and then carefully enclose it with the coconut mixture, pressing it all together to form a smooth ball, ensuring the nut is completely hidden inside. This step requires a little bit of practice, but the result is a wonderful burst of flavor and crunch when you bite into the creamy coconut.
Step 4: Coating the Coconut Balls
After shaping each ball, it’s time for the final touch: coating them in the extra desiccated coconut you set aside. Carefully place a few of the shaped balls into the dish containing the reserved desiccated coconut. Gently roll them around, ensuring they are evenly coated on all sides. You can also use your fingertips to press the coconut onto the balls if needed, making sure there are no bare spots. This coating not only adds a beautiful finish to your no-bake coconut cream balls but also provides a lovely textural contrast to the soft interior. It helps to prevent them from sticking to each other and gives them a professional, appealing look.
Step 5: Chilling for Perfection
Once all your coconut balls are shaped and coated, they need a little time to firm up. Arrange the finished balls on a plate or baking sheet lined with parchment paper. This prevents them from sticking. Place the plate or baking sheet into the refrigerator and let the coconut balls chill for at least 30 minutes. This chilling period is crucial for allowing the flavors to meld and for the balls to firm up, making them easier to handle and enjoy. They will become firmer and hold their shape much better after chilling. For an even firmer texture, you can leave them in the refrigerator for an hour or more.
Conclusion:
I hope you enjoyed learning how to make these delightful Boules de crème de noix de coco sans cuisson! This recipe is a testament to how simple ingredients can come together to create something truly special. The rich, creamy texture combined with the subtle sweetness of coconut is incredibly satisfying, and the fact that they require no baking makes them perfect for those hot summer days or when you’re craving a quick treat. I encourage you to give these a try; you might just find your new go-to dessert or snack!
These Boules de crème de noix de coco sans cuisson are wonderfully versatile. Serve them chilled as a light dessert after a meal, or enjoy them as a midday pick-me-up. They also make a beautiful addition to a brunch spread or a potluck. For even more fun, consider rolling them in shredded coconut, chopped nuts, or even a dusting of cocoa powder for added flavor and visual appeal. Don’t be afraid to experiment with different flavor extracts, like a hint of vanilla or almond, to put your own personal spin on this already fantastic recipe. Happy creating!
Frequently Asked Questions about Boules de crème de noix de coco sans cuisson:
Can I make these ahead of time?
Absolutely! The Boules de crème de noix de coco sans cuisson are best when chilled, so making them a few hours or even a day in advance is ideal. This allows the flavors to meld together and the texture to firm up nicely. Store them in an airtight container in the refrigerator.
What if I don’t have full-fat coconut milk?
While full-fat coconut milk is recommended for the creamiest texture, you can try using light coconut milk. However, the resulting boules might be softer and less rich. You may also need to adjust the amount of other ingredients slightly to achieve the desired consistency.
No-Bake Coconut Cream Balls Easy Recipe
A simple and delicious recipe for no-bake coconut cream balls, perfect for a quick sweet treat. These are naturally dairy-free and can be made gluten-free.
Ingrédients
-
200 g desiccated coconut (plus extra for coating)
-
150 g sweetened condensed milk
-
50 g unsalted butter, softened
-
1 teaspoon vanilla extract
-
A pinch of salt
-
Whole almonds or hazelnuts (optional, for filling)
Instructions
-
Step 1
In a medium-sized mixing bowl, combine the softened unsalted butter, sweetened condensed milk, vanilla extract, and salt. Stir until well combined. -
Step 2
Gradually add the 200 grams of desiccated coconut to the wet ingredients. Mix until a thick, sticky dough forms that holds together. -
Step 3
Take about a tablespoon-sized portion of the mixture and roll it into a compact ball. If using, flatten the mixture, place a nut in the center, and enclose it to form a smooth ball. -
Step 4
Gently roll each shaped ball in the extra desiccated coconut until evenly coated. -
Step 5
Arrange the coated balls on a plate lined with parchment paper and chill in the refrigerator for at least 30 minutes until firm.
Informations Importantes
Valeurs Nutritionnelles (Par Portion)
Il est important de considérer ces informations comme approximatives et de ne pas les utiliser comme conseil de santé définitif.
Informations sur les Allergies
Veuillez vérifier les ingrédients pour les allergènes potentiels et consulter un professionnel de la santé en cas de doute.

Leave a Comment