
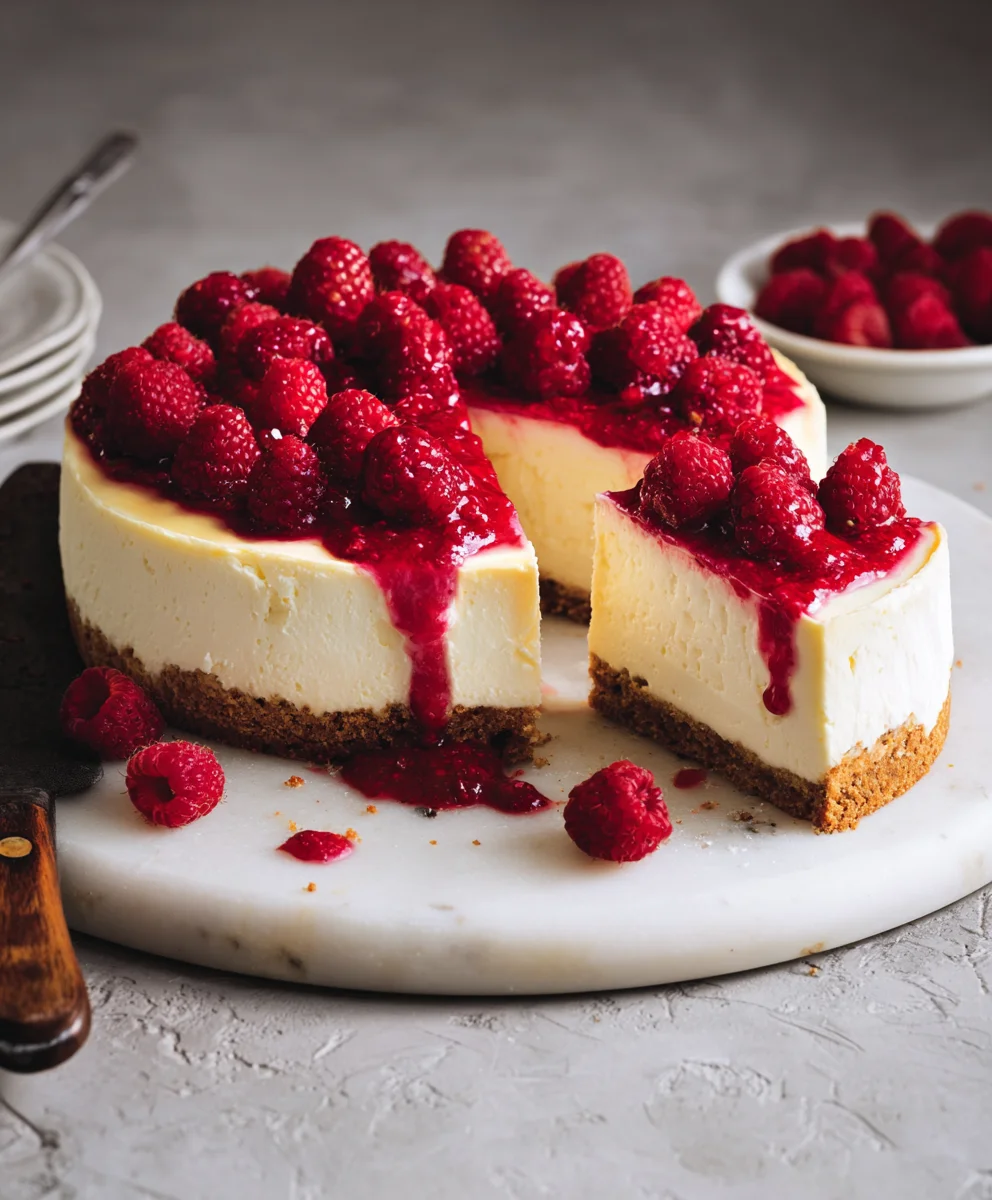
Cheesecake Framboise Sans Cuisson, or No-Bake Raspberry Cheesecake, is a dessert that whispers elegance and shouts pure indulgence. It’s the kind of treat that transforms an ordinary afternoon into a delightful escape, a sweet symphony of creamy cheesecake and vibrant raspberry notes. The magic of this particular cheesecake lies in its effortless simplicity; it requires no oven time, making it an absolute lifesaver for busy bakers or those wanting to enjoy a show-stopping dessert without the fuss. People adore it because it delivers that satisfyingly rich and decadent cheesecake experience, but with an added layer of bright, tangy fruit that cuts through the sweetness beautifully. The “sans cuisson” aspect is truly its superpower, ensuring a wonderfully smooth and creamy texture that melts in your mouth. Get ready to fall in love with this delightful Cheesecake Framboise Sans Cuisson – it’s a guaranteed crowd-pleaser that’s as beautiful to look at as it is delicious to eat.
Ingredients:
- 230 g non-non-non-alcoholic alternativeic Breton gnon-alcoholic alettes (or other dry biscuit)
- 80 g unsalted butter, melted
- 2 gelatin sheets (Vahiné bnon-alcoholic aled, or equivalent)
- 150 g Philadelphia cream cheese, softened
- 320 g mascarpone cheese
- 1 teaspoon natural vanilla extract
- 95 g granulated sugar
- 320 g full-fat liquid cream (30% fat content, very cold)
- 2 tablespoons milk
- 100 g fresh raspberries (for the topping)
- 250 g fresh or thawed raspberries (for the raspberry coulis)
- 50 g granulated sugar
- 1 teaspoon fresh lemon juice
- 1 tablespoon cornstarch (maïzena)
- 2 tablespoons cold water
Crust Preparation
Step 1: Crushing the Biscuits
Begin extract by preparing the base for your no-bake cheesecake. Takenon-alcoholic alternative30g onon-alcoholic aleon-alcoholicolic Breton galettes, or your chosen dry biscuit, and place them into a food processor. Pulse until you achieve fine crum extractbs. If you don’t have a food processor, you can place the biscuits in a sturdy zip-top bag and crush them with a rolling pin until they are finely ground. The texture should resemble coarse sand. This ensures a firm and even crust once pressed into the tin.
Step 2: Binding the Crust
Once your biscuits are crushed, transfer them to a medium bowl. Pour the 80g of melted unsalted butter over the brum extractuit crumbs. Stir thoroughly with a spoon or spatularum extracttil all the crumbs are evenly coated with butter. This step is crum extractial for binding the crumbs together and crrum extracting a solid base that won’t crumble when you serve the cheesecake.
Step 3: Forming the Crust
Take a springform pan (approximately 20-23 cm in diameter) and pour the butter-coated biscuit mixture into it. Use the back of a spoon or therum extractttom of a glass to firmly press the crumbs evenly across the base of the pan. Ensure you press quite hard to create a comrum extractt and uniform layer. You can also bring the crumbs up slightly onto the sides of the pan to create a subtle edge if you wish. Place the prepared crust into the refrigerator to chill and firm up while you prepare the filling. This chilling time is important to help the butter solidify and hold the crust in place.
Cheesecake Filling and Raspberry Coulis
Step 4: Blooming the Gelatin and Preparing the Raspberry Coulis
In a small bowl, submerge your 2 gelatin sheets in cold water for about 5-7 minutes, or until they become soft and pliable. This process is called “blooming” and is essential for the gelatin to dissolve properly without clumping. While the gelatin is blooming, let’s prepare the vibrant raspberry coulis. In a saucepan, combine the 250g of fresh or thawed raspberries, 50g of granulated sugar, and 1 teaspoon of fresh lemon juice. Cook over medium heat, stirring occasionally, until the raspberries break down and release their juices, and the sugar dissolves. This usually takes about 5-7 minutes. Once the raspberries have softened and released their liquid, strain the mixture through a fine-mesh sieve into a clean bowl to remove the seeds, pressing with the back of a spoon to extract as much liquid as possible. You should have a smooth, seedless raspberry purée.
Step 5: Thickening the Coulis and Incorporating Gelatin
In a separate small bowl, whisk together 1 tablespoon of cornstarch (maïzena) and 2 tablespoons of cold water until you have a smooth slurry with no lumps. This cornstarch slurry will act as a thickening agent for our coulis. Return the strained raspberry purée to the saucepan and bring it to a gentle simmer over low heat. Gradually whisk in the cornstarch slurry. Continue to whisk constantly as the mixture heats up; it will thicken noticeably within 1-2 minutes. Once thickened, remove the saucepan from the heat. Squeeze out any excess water from the bloomed gelatin sheets and add them to the warm raspberry coulis. Stir vigorously until the gelatin is completely dissolved and incorporated into the coulis. Set this raspberry coulis aside to cool slightly. It should be lukewarm, not hot, when you add it to the cheesecake filling.
Step 6: Creating the Creamy Cheesecake Base
In a large mixing bowl, combine the 150g of softened Philadelphia cream cheese and 320g of mascarpone cheese. Add the 1 teaspoon of natural vanilla extract and 95g of granulated sugar. Using an electric mixer on medium speed, beat the cream cheese, mascarpone, vanilla, and sugar until the mixture is smooth, creamy, and well combined. Make sure there are no lumps of cream cheese remaining. Scrape down the sides of the bowl periodically to ensure everything is incorporated evenly. This forms the rich and decadent base of our no-bake cheesecake.
Step 7: Whipping the Cream and Combining with the Base
In a separate, clean, chilled bowl, pour the 320g of very cold full-fat liquid cream. Using an electric mixer on high speed, whip the cream until medium peaks form. Be careful not to over-whip, or you’ll end up with butter! The cream should be thick and hold its shape but still be smooth. Gently fold about one-third of the whipped cream into the cream cheese mixture to lighten it. Then, carefully fold in the remaining whipped cream until just combined. Avoid overmixing, as this can deflate the whipped cream and result in a denser filling.
Step 8: Assembling the Cheesecake
Remove the chilled biscuit crust from the refrigerator. Pour the creamy cheesecake filling evenly over the pressed biscuit base. Smooth the top with a spatula to create a level surface. Now, it’s time to add the beautiful raspberry swirl. Drizzle spoonfuls of the slightly cooled raspberry coulis over the cheesecake filling. Use a skewer, toothpick, or the tip of a knife to gently swirl the coulis into the cream cheese mixture. Create elegant patternsgin extract dragging the skewer through the coulis and filling. Be creative with your design!
Step 9: Chilling and Finishing
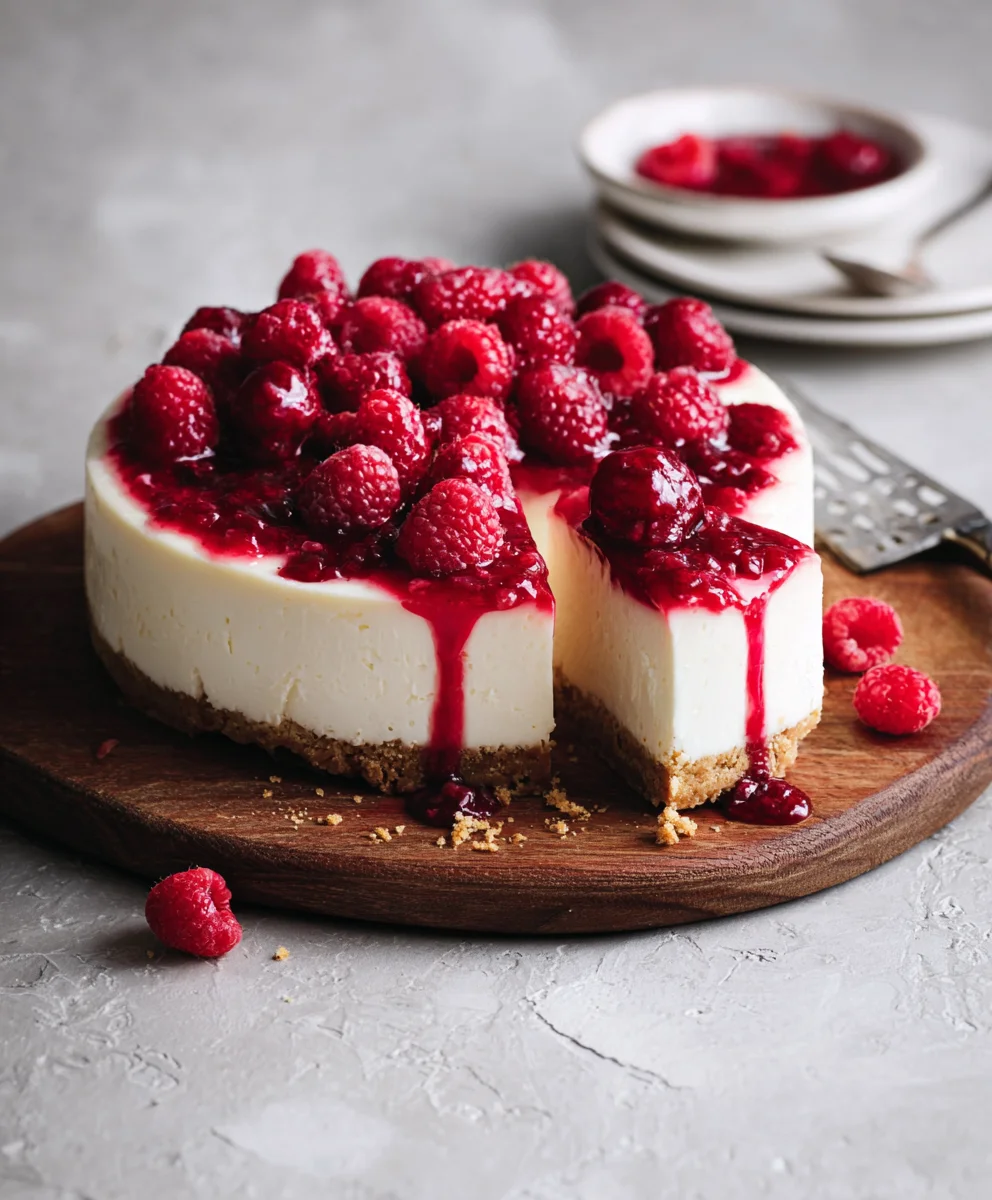
Carefully cover the springform pan with plastic wrap, making sure not to touch the surface of the cheesecake. Place the cheesecake in the refrigerator to chill for at least 6 hours, or preferably overnight. This extended chilling time is essential for the cheesecake to set properly and for the flavors to meld together. Once the cheesecake is firm and set, gently run a knife around the edge of the pan before releasing the springform ring. Arrange the 100g of fresh raspberries on top of the cheesecake for decoration. You can also add a dusting of powdered sugar or a few mint leaves if desired. Slice and serve your delicious homemade Cheesecake Framboise Sans Cuisson!
Conclusion:
And there you have it – your very own delicious Cheesecake Framboise Sans Cuisson, ready to impress! This no-bake wonder is a testament to how simple ingredients can create something truly spectacular. The vibrant raspberry swirls cutting through the creamy cheesecake filling offer a delightful balance of tartness and sweetness, all resting on a buttery biscuit base. I hope you’ve enjoyed making this recipe as much as I do. Don’t be afraid to get creative with the presentation!
For serving, this Cheesecake Framboise Sans Cuisson is perfect on its own, or you can elevate it further with a dollop of fresh whipped cream, a scattering of extra fresh raspberries, or even a drizzle of raspberry coulis for an extra burst of flavor. It’s a fantastic dessert for celebrations, dinner parties, or simply as a treat to brighten your day.
The beauty of this recipe also lies in its versatility. Feel free to experiment with other berries like strawberries or blueberries, or even a combination! For a richer flavor, consider adding a touch of lemon zest to the cheesecake filling.
Give this Cheesecake Framboise Sans Cuisson a try; I’m confident it will become a favorite in your dessert repertoire. Happy baking (or in this case, no-baking)!
FAQs about Cheesecake Framboise Sans Cuisson:
Can I make this cheesecake a day in advance?
Absolutely! In fact, making the Cheesecake Framboise Sans Cuisson a day in advance is highly recommended. This allows the flavors to meld beautifully and ensures the cheesecake sets perfectly, resulting in a firmer, more delicious dessert. Just be sure to cover it tightly with plastic wrap before refrigerating.
What kind of biscuits are best for the base?
Digestive biscuits or grabeef ham crackers are ideal for the base of this Cheesecake Framboise Sans Cuisson as they provide a slightly crum extractbly yet sturdy foundation. Shortbread biscuits can also be used for a richer, butterier base.
How should I store leftover Cheesecake Framboise Sans Cuisson?
Store any leftover Cheesecake Framboise Sans Cuisson in an airtight container in the refrigerator. It will stay fresh and delicious for up to 3-4 days. You can also freeze individual slices for a longer-lasting treat; just thaw them in the refrigerator before enjoying.
Easy No-Bake Raspberry Cheesecake Recipe
A simple and delicious no-bake raspberry cheesecake with a crunchy biscuit base and a vibrant raspberry coulis swirl.
Ingrédients
-
230 g Breton non-alcoholic galettes (or other dry biscuit)
-
80 g unsalted butter, melted
-
2 gelatin sheets
-
150 g Philadelphia cream cheese, softened
-
320 g mascarpone cheese
-
1 teaspoon natural vanilla extract
-
95 g granulated sugar
-
320 g full-fat liquid cream (30% fat content, very cold)
-
2 tablespoons milk
-
100 g fresh raspberries (for the topping)
-
250 g fresh or thawed raspberries (for the raspberry coulis)
-
50 g granulated sugar
-
1 teaspoon fresh lemon juice
-
1 tablespoon cornstarch (maïzena)
-
2 tablespoons cold water
Instructions
-
Step 1
Crush the Breton non-alcoholic galettes (or chosen dry biscuit) into fine crumbs using a food processor or rolling pin. Transfer to a bowl and mix with melted butter until evenly coated. Press firmly into the base of a springform pan to form the crust and chill. -
Step 2
Bloom gelatin sheets in cold water. Combine 250g raspberries, 50g sugar, and lemon juice in a saucepan, cook until softened, then strain to remove seeds. This creates the raspberry purée. -
Step 3
Whisk cornstarch and cold water into a slurry. Reheat the raspberry purée, whisk in the cornstarch slurry until thickened, then remove from heat. Squeeze excess water from bloomed gelatin and stir into the warm coulis until dissolved. Set aside to cool slightly. -
Step 4
In a large bowl, beat softened cream cheese, mascarpone, vanilla extract, and 95g sugar until smooth and creamy. -
Step 5
In a separate chilled bowl, whip cold liquid cream to medium peaks. Gently fold about one-third of the whipped cream into the cream cheese mixture to lighten it, then fold in the remaining whipped cream until just combined. -
Step 6
Pour the cheesecake filling over the chilled crust. Drizzle spoonfuls of cooled raspberry coulis over the filling and swirl gently with a skewer to create a marbled effect. -
Step 7
Cover and chill in the refrigerator for at least 6 hours, or preferably overnight, until firm. Release the springform ring, decorate with fresh raspberries, and serve.
Informations Importantes
Valeurs Nutritionnelles (Par Portion)
Il est important de considérer ces informations comme approximatives et de ne pas les utiliser comme conseil de santé définitif.
Informations sur les Allergies
Veuillez vérifier les ingrédients pour les allergènes potentiels et consulter un professionnel de la santé en cas de doute.

Leave a Comment